
If you’re planning a home remodel, basement finish, or new construction project in the Fredericksburg, Stafford, Spotsylvania, or Northern Virginia region, drywall may not be the first thing on your mind. Most homeowners think about flooring, paint colors, cabinets, lighting—but the truth is, the drywall behind all those choices plays a major role in the final look and feel of your home.
At Dickinson Drywall & Construction, we believe every homeowner deserves to understand the process behind the scenes. When you know what goes into hanging, finishing, and perfecting drywall, you’re better equipped to plan your project, communicate expectations, and recognize quality craftsmanship.
This guide explains why drywall matters, what happens at each installation step, how finishing levels work, and what to expect when our team works on your home. Whether you’re upgrading one room or building a house from the ground up, this walkthrough will help you feel confident and prepared.
1. Why Drywall Matters
Drywall does more than create a surface to paint. It influences the look, comfort, and performance of your home. When installed correctly, it creates smooth walls, strong corners, and quiet rooms. Poor installation, however, leads to visible seams, cracks, nail pops, or uneven textures—flaws that even high-end paint can’t hide.
Drywall contributes to:
- Sound control between rooms
- Fire resistance, especially in garages and multi-family homes
- Energy efficiency, when paired with proper insulation
- Moisture management, crucial for basements and bathrooms
- A polished, long-lasting finish that elevates your home’s value
In regions like Fredericksburg and Northern Virginia, where humidity shifts throughout the year, high-quality drywall becomes even more important.
2. A Step-by-Step Breakdown of the Drywall Installation Process
Drywall installation involves more than simply attaching sheets to the wall. It’s a structured process that requires technical skill, the right materials, and attention to detail.
Below is a clear look at how the team at Dickinson Drywall & Construction approaches each stage.
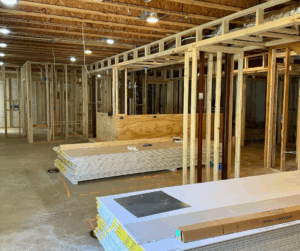
Step 1: Framing & Jobsite Preparation
Before drywall can be installed, the framing has to be correct. Our team inspects the studs to ensure they’re:
- Plumb (perfectly vertical)
- Properly spaced
- Secure
- Free of warping
Any framing issues must be corrected before moving forward; otherwise, the drywall won’t lay flat. We also confirm that plumbing, electrical work, and ductwork are completed and inspected.
During this phase, we take measures to protect flooring, cover openings, and prepare the workspace so installation goes smoothly.
Step 2: Hanging the Drywall Sheets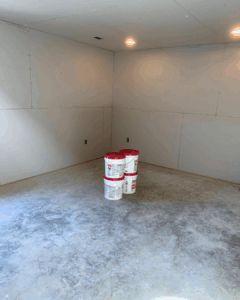
This is the most visible part of the process, when large drywall panels are installed on walls and ceilings. It’s a step that requires precision—every cut and screw placement affects the final finish.
Good installation includes:
- Correct screw spacing
- Clean cuts around outlets and windows
- Tight seams
- Minimized butt joints
- Straight lines and clean corners
We also choose materials appropriate for each room. For example:
- ½-inch drywall for most rooms
- ⅝-inch fire-rated drywall for garages and certain ceilings
- Moisture-resistant drywall for basements, laundry rooms, and bathrooms
Good hanging sets the stage for a flawless finish later.
Step 3: Taping & Mudding the Seams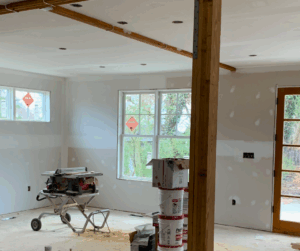
Once the walls are hung, the finishing process begins. This is where the real transformation happens, and where skill truly matters.
Taping:
We embed tape into a coat of joint compound along every seam. Tape strengthens the joints and prevents cracking over time.
Mudding:
After the tape dries, we apply multiple layers of joint compound. Typically, three coats are used:
- Tape coat: Covers the tape and bonds it to the drywall.
- Fill coat: Adds thickness and smooths transitions between boards.
- Finish coat: Creates a blended, paint-ready surface.
The timing between coats matters, too. Each layer must fully dry before the next one is applied, which often depends on humidity levels—something Northern Virginia homeowners know all too well.
Step 4: Sanding & Surface Preparation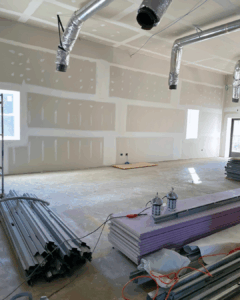
Once the compound is dry, sanding begins. This step smooths out the final surface so no lines, ridges, or uneven spots remain.
Depending on your finish level (explained in the next section), we may apply a skim coat, which is a thin layer of joint compound spread across the entire surface. This creates the smoothest possible finish, especially useful in rooms with:
- Bright natural light
- Gloss or semi-gloss paint
- Contemporary flat-wall designs
Good sanding is subtle, clean, and controlled—no clouds of dust, no gouges in the wall, and no uneven spots that suddenly appear when the sun hits the surface.
Step 5: Final Inspection & Cleanup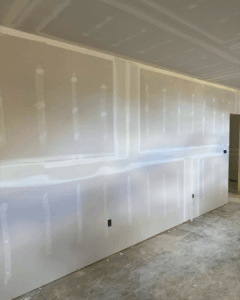
Once sanding is done, the surface is fully inspected. We check corners, transitions, screw heads, seams, and finishes. Only when everything meets our standards do we consider the job complete.
Finally, we clean the workspace thoroughly. Homeowners frequently comment on how clean their space looks after we leave—that’s something we’re proud of.
3. Understanding Drywall Finishes: Level 1 to Level 5
In the drywall world, finishes are classified by levels. If you’re remodeling your home in the Fredericksburg region, understanding these levels helps you choose the best option for your budget, room type, and design goals.
Level 1—Basic
Used in areas where the walls won’t be seen, like behind mechanical equipment or inside closets of unfinished spaces.
Level 2—Mostly Functional
Common in garages, utility spaces, or storage areas. You wouldn’t typically paint a Level 2 finish for a main living area.
Level 3—For Textured Walls
This level is appropriate when the final wall will receive a heavy texture, not smooth paint. Not typically used in most modern homes.
Level 4—The Residential Standard
This is the level used in almost every remodeled home or new construction project. It creates a smooth surface suitable for standard paints and most lighting conditions.
Level 5—The Premium Choice
A skim coat is added over the entire wall surface. This provides the highest level of smoothness and is ideal for:
- Brightly lit rooms
- High-end finishes
- Glossy or semi-gloss paint
- Contemporary flat finishes
- High-traffic or highly visible spaces
Many luxury homes request a Level 5 finish for its flawless look.
4. What It’s Like When Our Team Works in Your Home
Hiring a contractor should make your project easier, not more stressful. Homeowners throughout the Fredericksburg region appreciate the professionalism, communication, and respect that our team brings to every job.
Here’s what you can expect:
Punctual, Reliable Scheduling
We understand that drywall work is often one part of a larger renovation schedule. We stay on time so your next contractor—paint, flooring, cabinets—can start as planned.
Skilled, Trained Crew Members
Every installer and finisher on our team is trained in proper techniques, safety, and local building codes. Quality workmanship is our standard, not an upgrade.
Clear Communication
You’ll never be left wondering what the next step is. We walk you through the timeline, explain the process, and keep you updated throughout the project.
Clean, Organized Workspaces
We protect your home, minimize dust, and clean thoroughly when we’re done. Homeowners frequently mention how tidy the jobsite is.
Consistent Quality—No Heavy Subcontracting
Our reliability comes from keeping the work in-house. You know exactly who is working in your home, and you can trust the quality of the results.
5. Common Drywall Questions from Fredericksburg Homeowners
How long does drywall installation take?
A typical three-bedroom home may take two to three days for installation, plus an additional three to five days for finishing, drying time, and sanding. Weather and humidity can affect drying times, especially in basements.
Can drywall help with moisture-prone rooms?
Absolutely. We use moisture-resistant boards in bathrooms, laundry rooms, and basements—essential in Virginia’s climate.
How do I know if the finish is high quality?
Look for:
- No visible seams
- Even surfaces
- Smooth corners
- No bubbling or cracks
- No raised screw heads
- A uniform finish with no shadows
Poor drywall work is noticeable the moment sunlight hits the walls.
Do you handle painting and other finishing work too?
Yes. Dickinson Drywall & Construction can also complete:
Many homeowners choose us because they want everything done by one trusted team.
6. Why High-Quality Drywall Work is Worth It
Drywall isn’t flashy, but it has one of the biggest impacts on the final look of your remodel or new construction project. Even the most beautiful paint, trim, or lighting can’t compensate for poorly finished walls.
A professional drywall job creates:
- Smoother surfaces
- Stronger walls
- Cleaner lines
- Better long-term durability
- A higher-value outcome
For homeowners in Fredericksburg, Stafford, Spotsylvania, and Northern Virginia, choosing an experienced drywall contractor ensures your investment looks polished, high-quality, and built to last.
Ready to Start Your Project?
If you’re remodeling, finishing a basement, or completing a new build, the quality of your drywall matters. At Dickinson Drywall & Construction, we provide long-lasting craftsmanship, excellent communication, and a smooth, professional finish every time.
Call today: 540-318-6030